Conversion balance in Xero
When you migrate to Xero from another accounting system- whether that's Sage, QuickBooks, FreeAgent, or a spreadsheet- getting your conversion balances right is one of the most important steps you will take. Errors at this stage can affect your reports, VAT returns, and year-end accounts. This step-by-step guide walks you through everything you need to know.
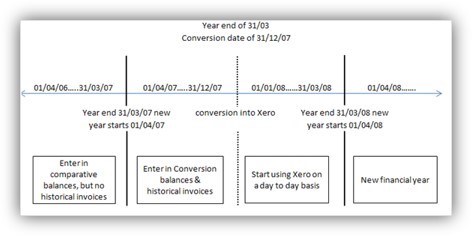
Conversion balances are the balances in your accounting system on the day you are converting to Xero. Xero uses these figures to calculate and post the opening journal your accounts require.
Comparative balances are older balances from a previous financial year that you wish to display alongside current-year figures in Xero's reports.
What Are Conversion Balances in Xero?
Conversion balances represent the financial position of your business at the point you begin using Xero. They include the opening balances for all your accounts- bank accounts, accounts receivable (debtors), accounts payable (creditors), fixed assets, liabilities, and equity- as they stood at the close of your final day on your previous system.
Xero uses these balances to create a conversion journal, which ensures your books start from an accurate position. Without correctly entered conversion balances, your trial balance, balance sheet, and profit and loss reports will all contain errors from day one.
What you will need before you start: A copy of your previous accounting system's trial balance as at the day before your conversion date. For example, if your Xero conversion date is 1 January, use the trial balance dated 31 December.
Conversion Balances vs Comparative Balances: What’s the Difference?
Before you begin, it is important to understand the distinction between these two types of balances:
Term | What It Means in Xero |
Conversion Balances | The closing figures from your old accounting system, entered as opening balances in Xero. These represent your financial position on conversion day. |
Comparative Balances | Prior-year figures (one or more years back) you wish to display alongside current-year data in reports such as your Profit & Loss and Balance Sheet. |
Conversion Journal | The journal Xero automatically posts each time you save conversion balances, ensuring all accounts are balanced. |
Conversion Date | The first day you use Xero for day-to-day accounting. Always the first of a month in Xero. |
Entering Conversion Balances: The Four Key Steps
Setting up conversion balances in Xero is divided into four sequential steps. Complete them in order to ensure your opening position is accurate.
Step 1: Set Your Conversion Date
Choose the date you want to start using Xero for your day-to-day accounting. In Xero, the conversion date is always the first day of a month.
Tips for choosing the right conversion date:
- VAT-registered businesses: Align your conversion date with the start of a VAT quarter. This prevents split-period VAT returns and keeps your submissions clean.
- Non-VAT-registered businesses: The current month is usually the simplest option.
- Converting mid-year: You can set a past conversion date if you need to recreate historical records, or a future date if you want to get set up before going live.
- Ideally, align your conversion date with the start of your financial year to simplify year-end reporting.
Important: Once transactions have been posted in Xero after your conversion date, changing the date becomes complex. Choose it carefully before you go live.
Step 2: Enter Your Conversion Balances
These are the closing balances from your current accounting system, Excel spreadsheet, or other record-keeping system, as at the last day you were using it. They will become the opening (conversion) balances in Xero.
You will need a copy of your previous system’s trial balance for the day before your conversion date. For example, if your Xero conversion date is 1 January, use the trial balance dated 31 December.
Step 3: Enter Historical Invoices or Bills
These are the individual outstanding invoices and bills that make up your accounts receivable (Sales) and accounts payable (Purchases) conversion balances.
Why this step matters: Entering just a total for your debtors or creditors is not sufficient. You must enter each outstanding invoice and bill individually so that Xero can match them against future payments and receipts.
Step 4: Post Your Balances
How you post your balances depends on where you are in the Xero setup process:
- During initial Set-up: Clicking the ‘Finish’ button on the final screen will post your conversion balances and historical invoices or bills.
- After Set-up is complete: The ‘Confirm’ button will post any draft historical invoices or bills, together with your conversion balances.
How to Manually Enter Conversion Balances in Xero (Step-by-Step)
Follow these instructions to manually enter or adjust conversion balances at any time.
- In the Accounting menu, select Advanced, then click Conversion Balances.
- Click Show All Accounts. To add a new account, click Add a New Line, then click Add New Account.
- Enter the balances from your previous accounting system’s trial balance into the Debit and Credit fields.
- Click Save.
- Enter any unpaid invoices and bills (accounts receivable and payable).
- Enter any outstanding overpayments and prepayments made or received prior to conversion. Ensure the transactions are dated pre-conversion, and the total values are included in your conversion balances.
- Enter any unpaid expense claims dated prior to conversion. Include the total of these claims in the conversion balance screen under the account code for unpaid expense claims.
- (Optional) To correct conversion balances, click on the incorrect figure, replace it with the correct balance, and click Save.
When you save your conversion balances, Xero posts a conversion journal that ensures all account balances match what is entered in the Conversion Balances screen.
Note: Xero posts a new conversion journal every time you click Save. Any previous conversion journal is automatically reversed and replaced with the new one.
How to Enter Comparative Balances in Xero
Entering comparative balances is done after the Set-up process is complete, from the Conversion Balances screen. Comparative balances are particularly useful when preparing statutory accounts or management reports where you need to show year-on-year comparisons.
To enter comparative balances:
- From the Conversion Balances screen, click the Comparative Balances button.
- A table of accounts for the previous financial year will display, based on your conversion date and reporting date, in the same format as your conversion balances.
- Enter the prior-year figures. You can add as many previous years as required.
- Click Save.
What happens when you save comparative balances:
Importing Conversion Balances in Bulk (CSV Method)
If you have a large number of accounts, manually entering each balance can be time-consuming. Xero allows you to import conversion balances using a CSV file. This is especially useful when migrating from Sage, QuickBooks, or another system with a long chart of accounts.
- Prepare a CSV file containing your account codes and corresponding opening balances (debit or credit).
- Go to Accounting → Advanced → Conversion Balances.
- Use the import option to upload your CSV file.
- Review the data mapping carefully to ensure each balance is allocated to the correct account.
- Confirm the import to post your balances.
VAT Considerations When Setting Conversion Balances (UK Businesses)
For UK businesses that are VAT-registered, the following points are essential to get right:
- Single VAT control account: Xero uses a single VAT control account, unlike Sage, which may use separate Sales Tax Control and Purchase Tax Control accounts. When entering conversion balances, use the net balance of all VAT accounts from your previous system.
- Cash Accounting VAT Scheme: Ensure any outstanding VAT on payments not yet received or made is correctly reflected in your opening balances.
- Overpayments with VAT: Overpayments in Xero cannot be posted with VAT to the creditors or debtors control account. If your old system holds VAT-bearing overpayments, you may need a manual adjustment on your next post-conversion VAT return.
- Align with VAT periods: Always set your Xero conversion date to coincide with the start of a VAT quarter to avoid the need for split-period VAT returns.
Common Mistakes to Avoid When Entering Conversion Balances
Based on our experience helping UK businesses migrate to Xero, these are the most frequent errors we encounter:
# | Mistake | How to Avoid It |
1 | Debits and credits not balancing | Reconcile your trial balance before entering figures. If totals don’t balance, Xero posts the difference to an ‘Ask My Accountant’ account. |
2 | Entering gross totals instead of net | Enter net (ex-VAT) values for accounts receivable and payable. VAT is handled separately in Xero. |
3 | Not entering individual invoices and bills | A total figure for debtors or creditors is not sufficient. Enter each outstanding invoice and bill individually. |
4 | Choosing the wrong conversion date | Select your date carefully before going live. Changing it after transactions are posted is complex. |
5 | Omitting overpayments and prepayments | All pre-conversion overpayments and prepayments must be entered as pre-conversion transactions and included in your conversion balance totals. |
6 | Using gross VAT balance from old system | Xero uses a single net VAT control account. Adjust accordingly when migrating from Sage or similar systems. |
Frequently Asked Questions
What is a conversion balance in Xero?
A conversion balance is the opening balance for each account in your Xero organisation, set as at your chosen conversion date. It represents the financial position of your business when you begin using Xero.
What is the difference between a conversion balance and a comparative balance in Xero?
Conversion balances are your opening (starting) figures in Xero. Comparative balances are historical figures from a prior financial year that you want to display alongside current-year data in your reports.
Can I change my conversion balances after going live in Xero?
Yes. Go to Accounting → Advanced → Conversion Balances, update the figures, and click Save. Xero will reverse the previous conversion journal and post a new one. However, if significant transactions have already been posted, we recommend consulting your accountant before making changes.
Do conversion balances affect my VAT return?
Conversion balances themselves do not appear directly on your VAT return. However, errors in your opening balances- particularly around VAT control accounts- can cause discrepancies in your VAT returns. It is important to reconcile your VAT position carefully at the time of conversion.
What is a Xero conversion journal?
Xero automatically creates a conversion journal each time you save your conversion balances. This journal ensures the total of all account balances in Xero matches the figures you have entered. It is reversed and reposted each time you update your conversion balances.
Can I import conversion balances into Xero using a CSV file?
Yes. Xero supports bulk import of conversion balances via a CSV file. This is useful for businesses with a large chart of accounts or those migrating from systems such as Sage or QuickBooks.
What happens if my conversion balances don’t balance in Xero?
If your total debits do not equal total credits, Xero will automatically post the difference to an account called ‘Ask My Accountant’ (or similar). This is a flag that your figures need reviewing. You should investigate the discrepancy and correct your balances before proceeding.
Need Help Setting Up Xero for Your UK Business?
At Outbooks, our Xero-certified bookkeeping team has extensive experience helping UK businesses migrate to Xero accurately and efficiently. Whether you are converting from Sage, QuickBooks, FreeAgent, or a spreadsheet, we can ensure your conversion balances are entered correctly- giving you clean, reliable accounts from day one.

Parul is a content specialist with expertise in accounting and bookkeeping. Her writing covers a wide range of accounting topics such as payroll, financial reporting and more. Her content is well-researched and she has a strong understanding of accounting terms and industry-specific terminologies. As a subject matter expert, she simplifies complex concepts into clear, practical insights, helping businesses with accurate tips and solutions to make informed decisions.